

HubSpot CRM Integration
Last updated:
Connect Inletbase to HubSpot and every form submission becomes a contact in your CRM automatically. If the email address is already in HubSpot, that contact is updated. If it is not, a new one is created. Either way the full submission is attached to the contact as a note, so you keep the answers to questions that have no matching CRM field.
There is no middleware, no Zapier task fee, and nothing to copy and paste. You connect the account once, choose which form field fills which HubSpot property, and submissions start flowing.
Before you start
- An Inletbase account on the Pro or Business plan. CRM integrations are not included on the free Starter plan — see pricing.
- Workspace admin access in Inletbase. A CRM connection applies to the whole workspace, so only admins can create or remove one. Members can map fields on a connection an admin has already made.
- A HubSpot account where you can approve app installations, and at least one Inletbase form with an email field.
Step 1: Start the connection
You can begin from either side.
From the HubSpot App Marketplace
- Find Inletbase in the HubSpot App Marketplace and click Install.
- You are sent to Inletbase to sign in. If you do not have an account yet you can create one at this point, and you will be returned to the install automatically.
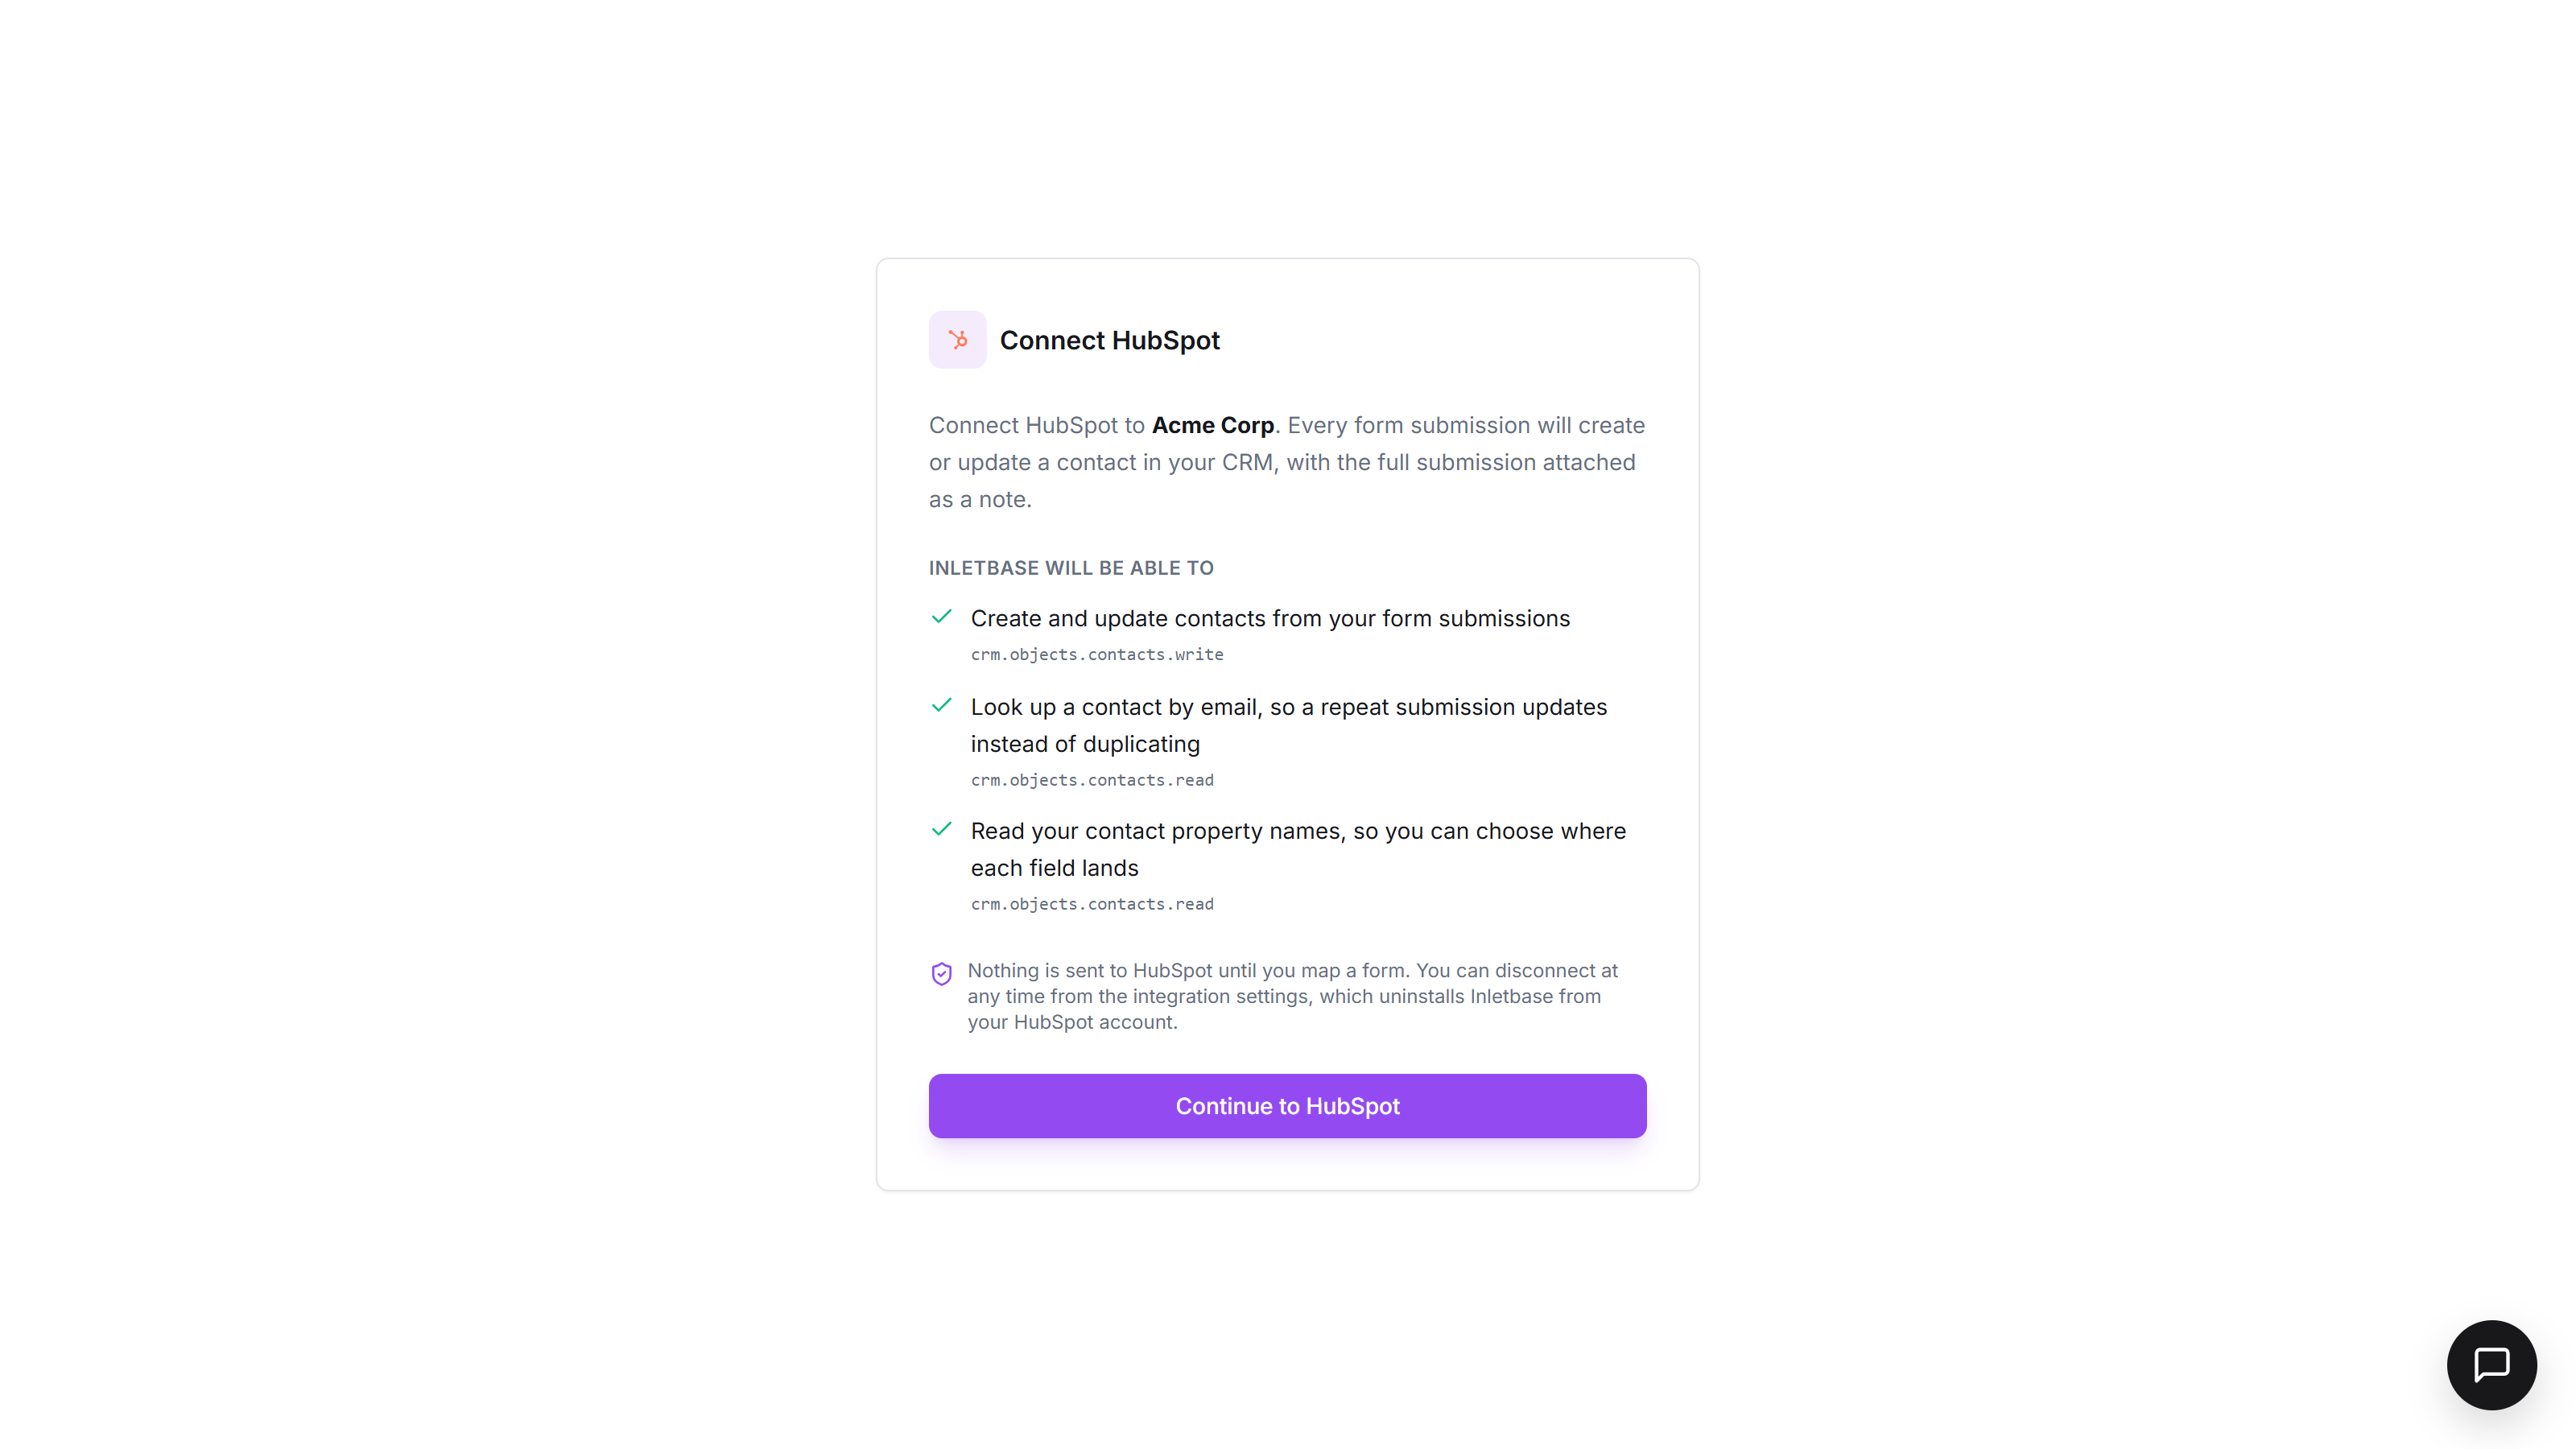
- Review what Inletbase will be able to do, then click Continue to HubSpot.
From the Inletbase dashboard
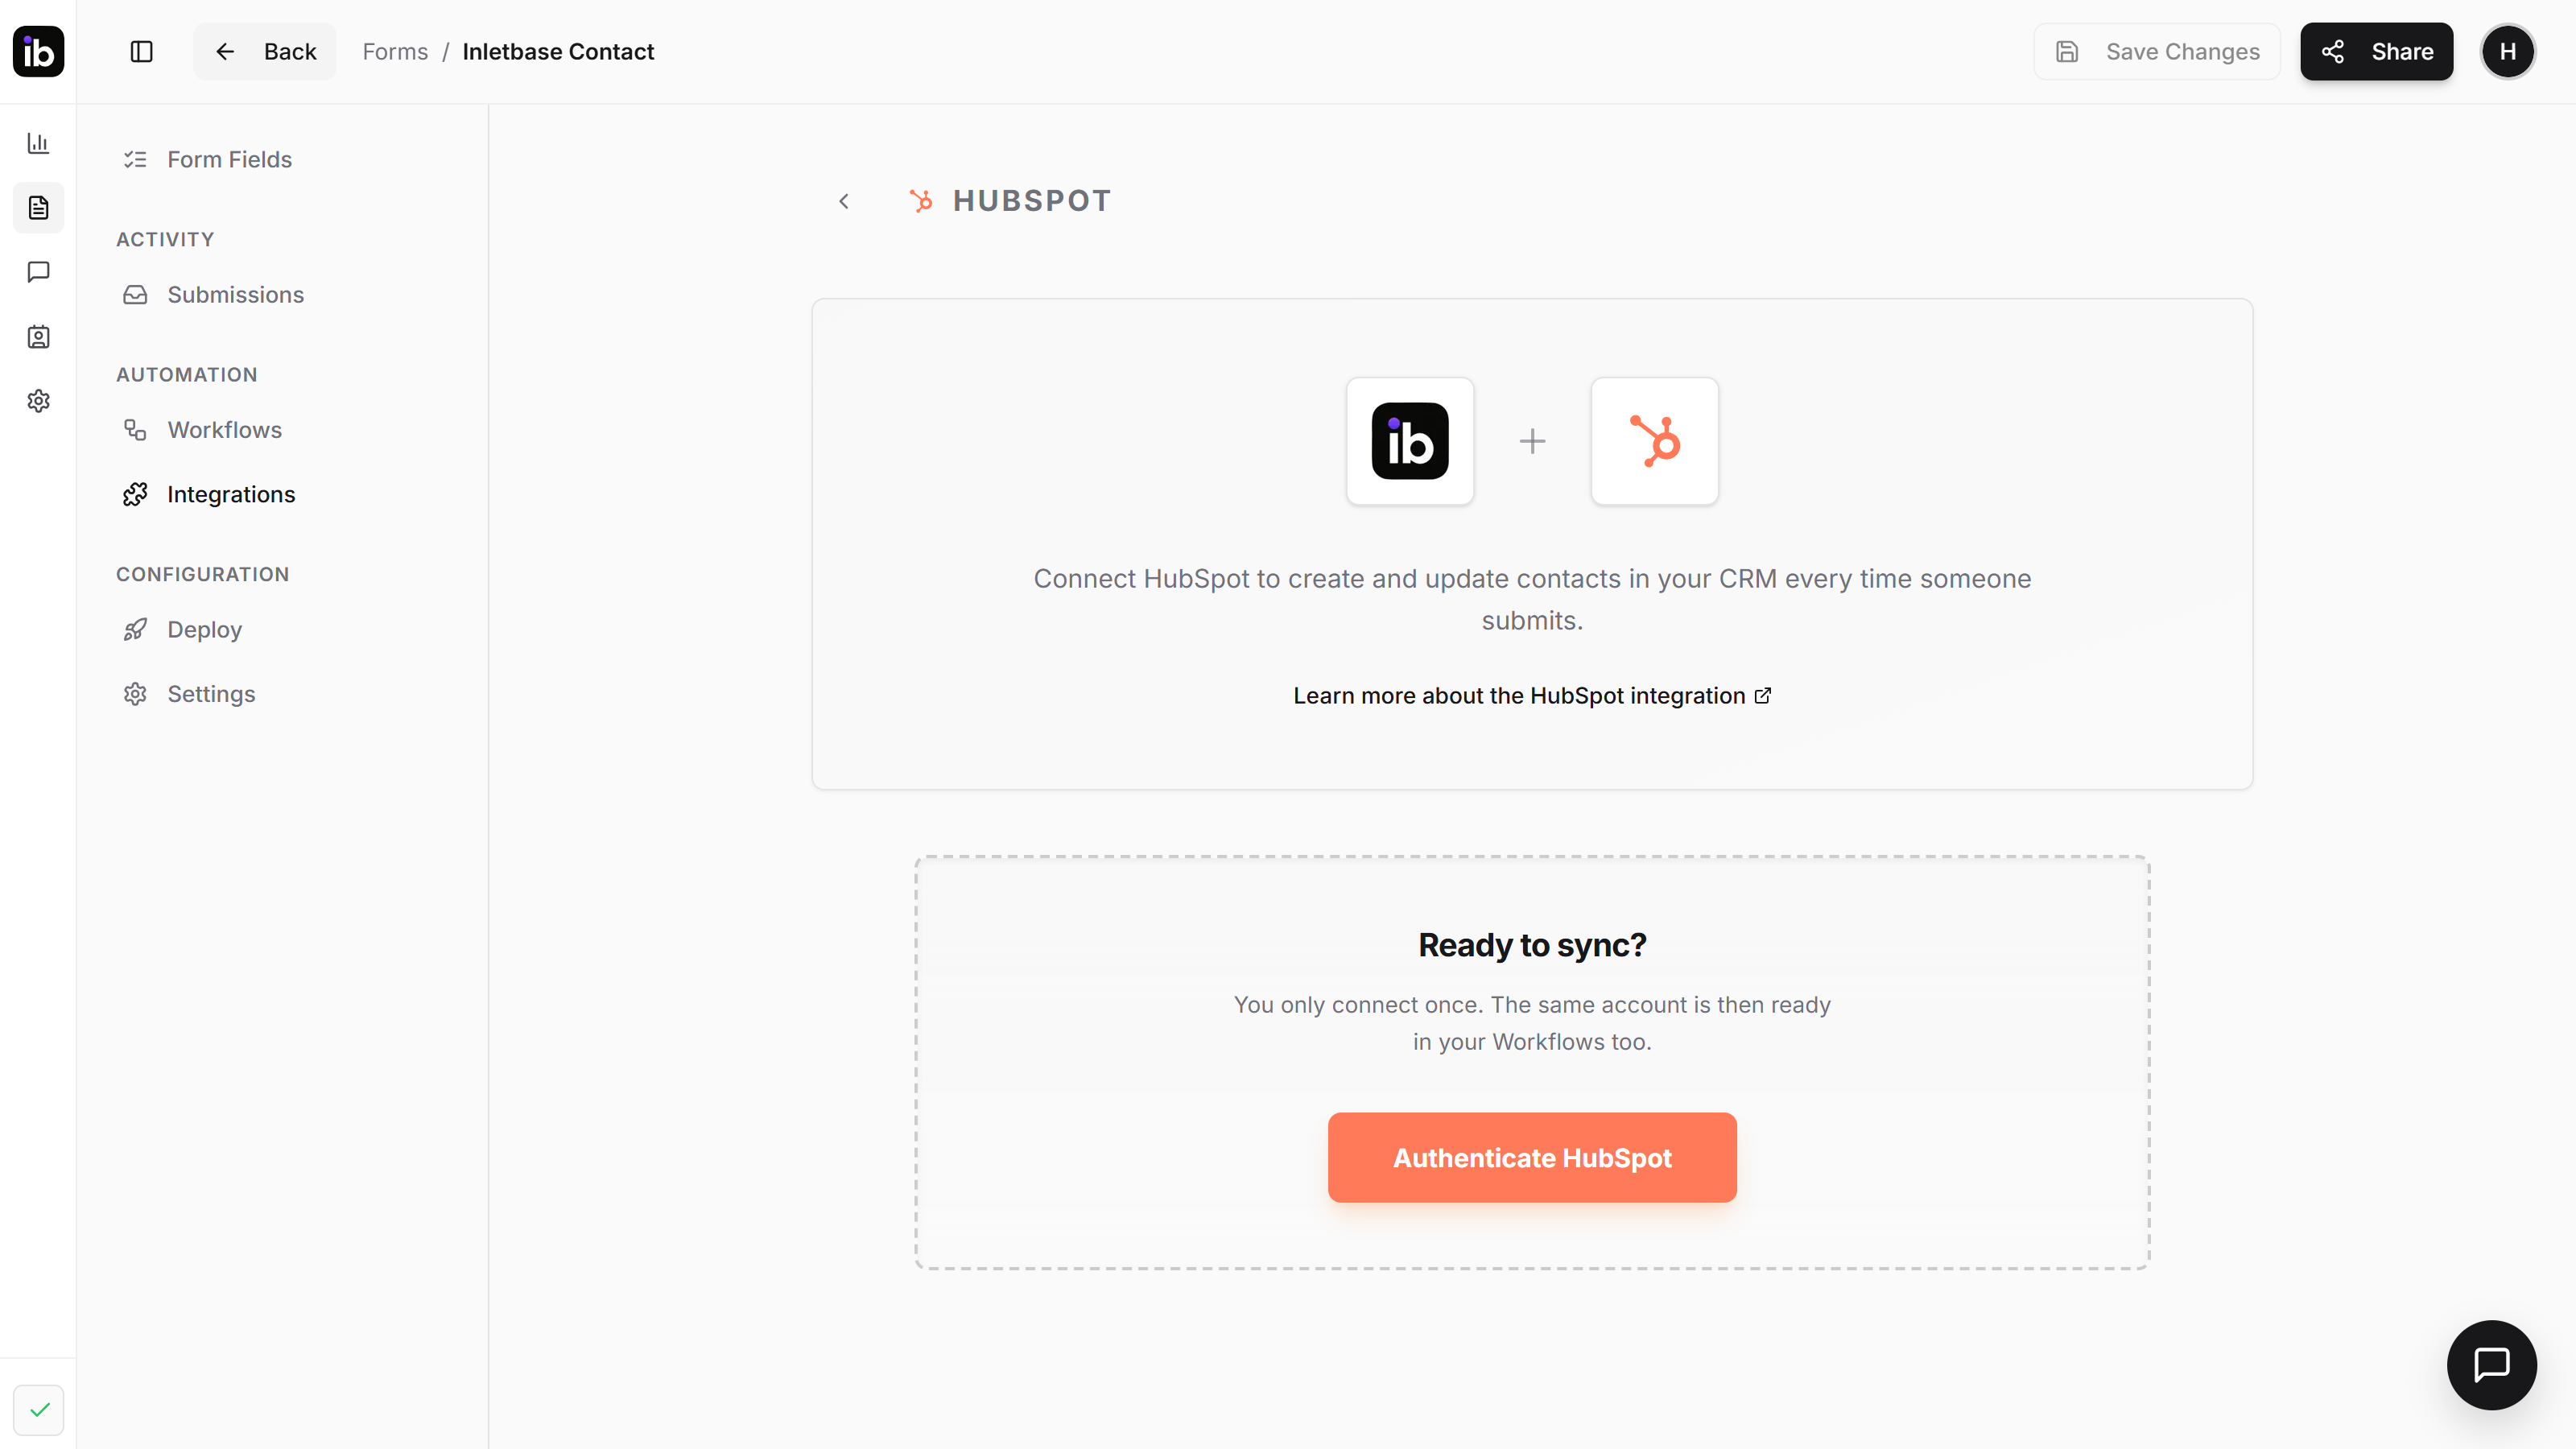
- Open Forms and select the form whose submissions should reach HubSpot.
- Open the Integrations tab and choose HubSpot.
- Click Authenticate HubSpot.
Step 2: Approve the permissions
HubSpot asks you to choose an account and shows exactly what Inletbase is requesting. Pick the account you want to sync to, then click Connect app.
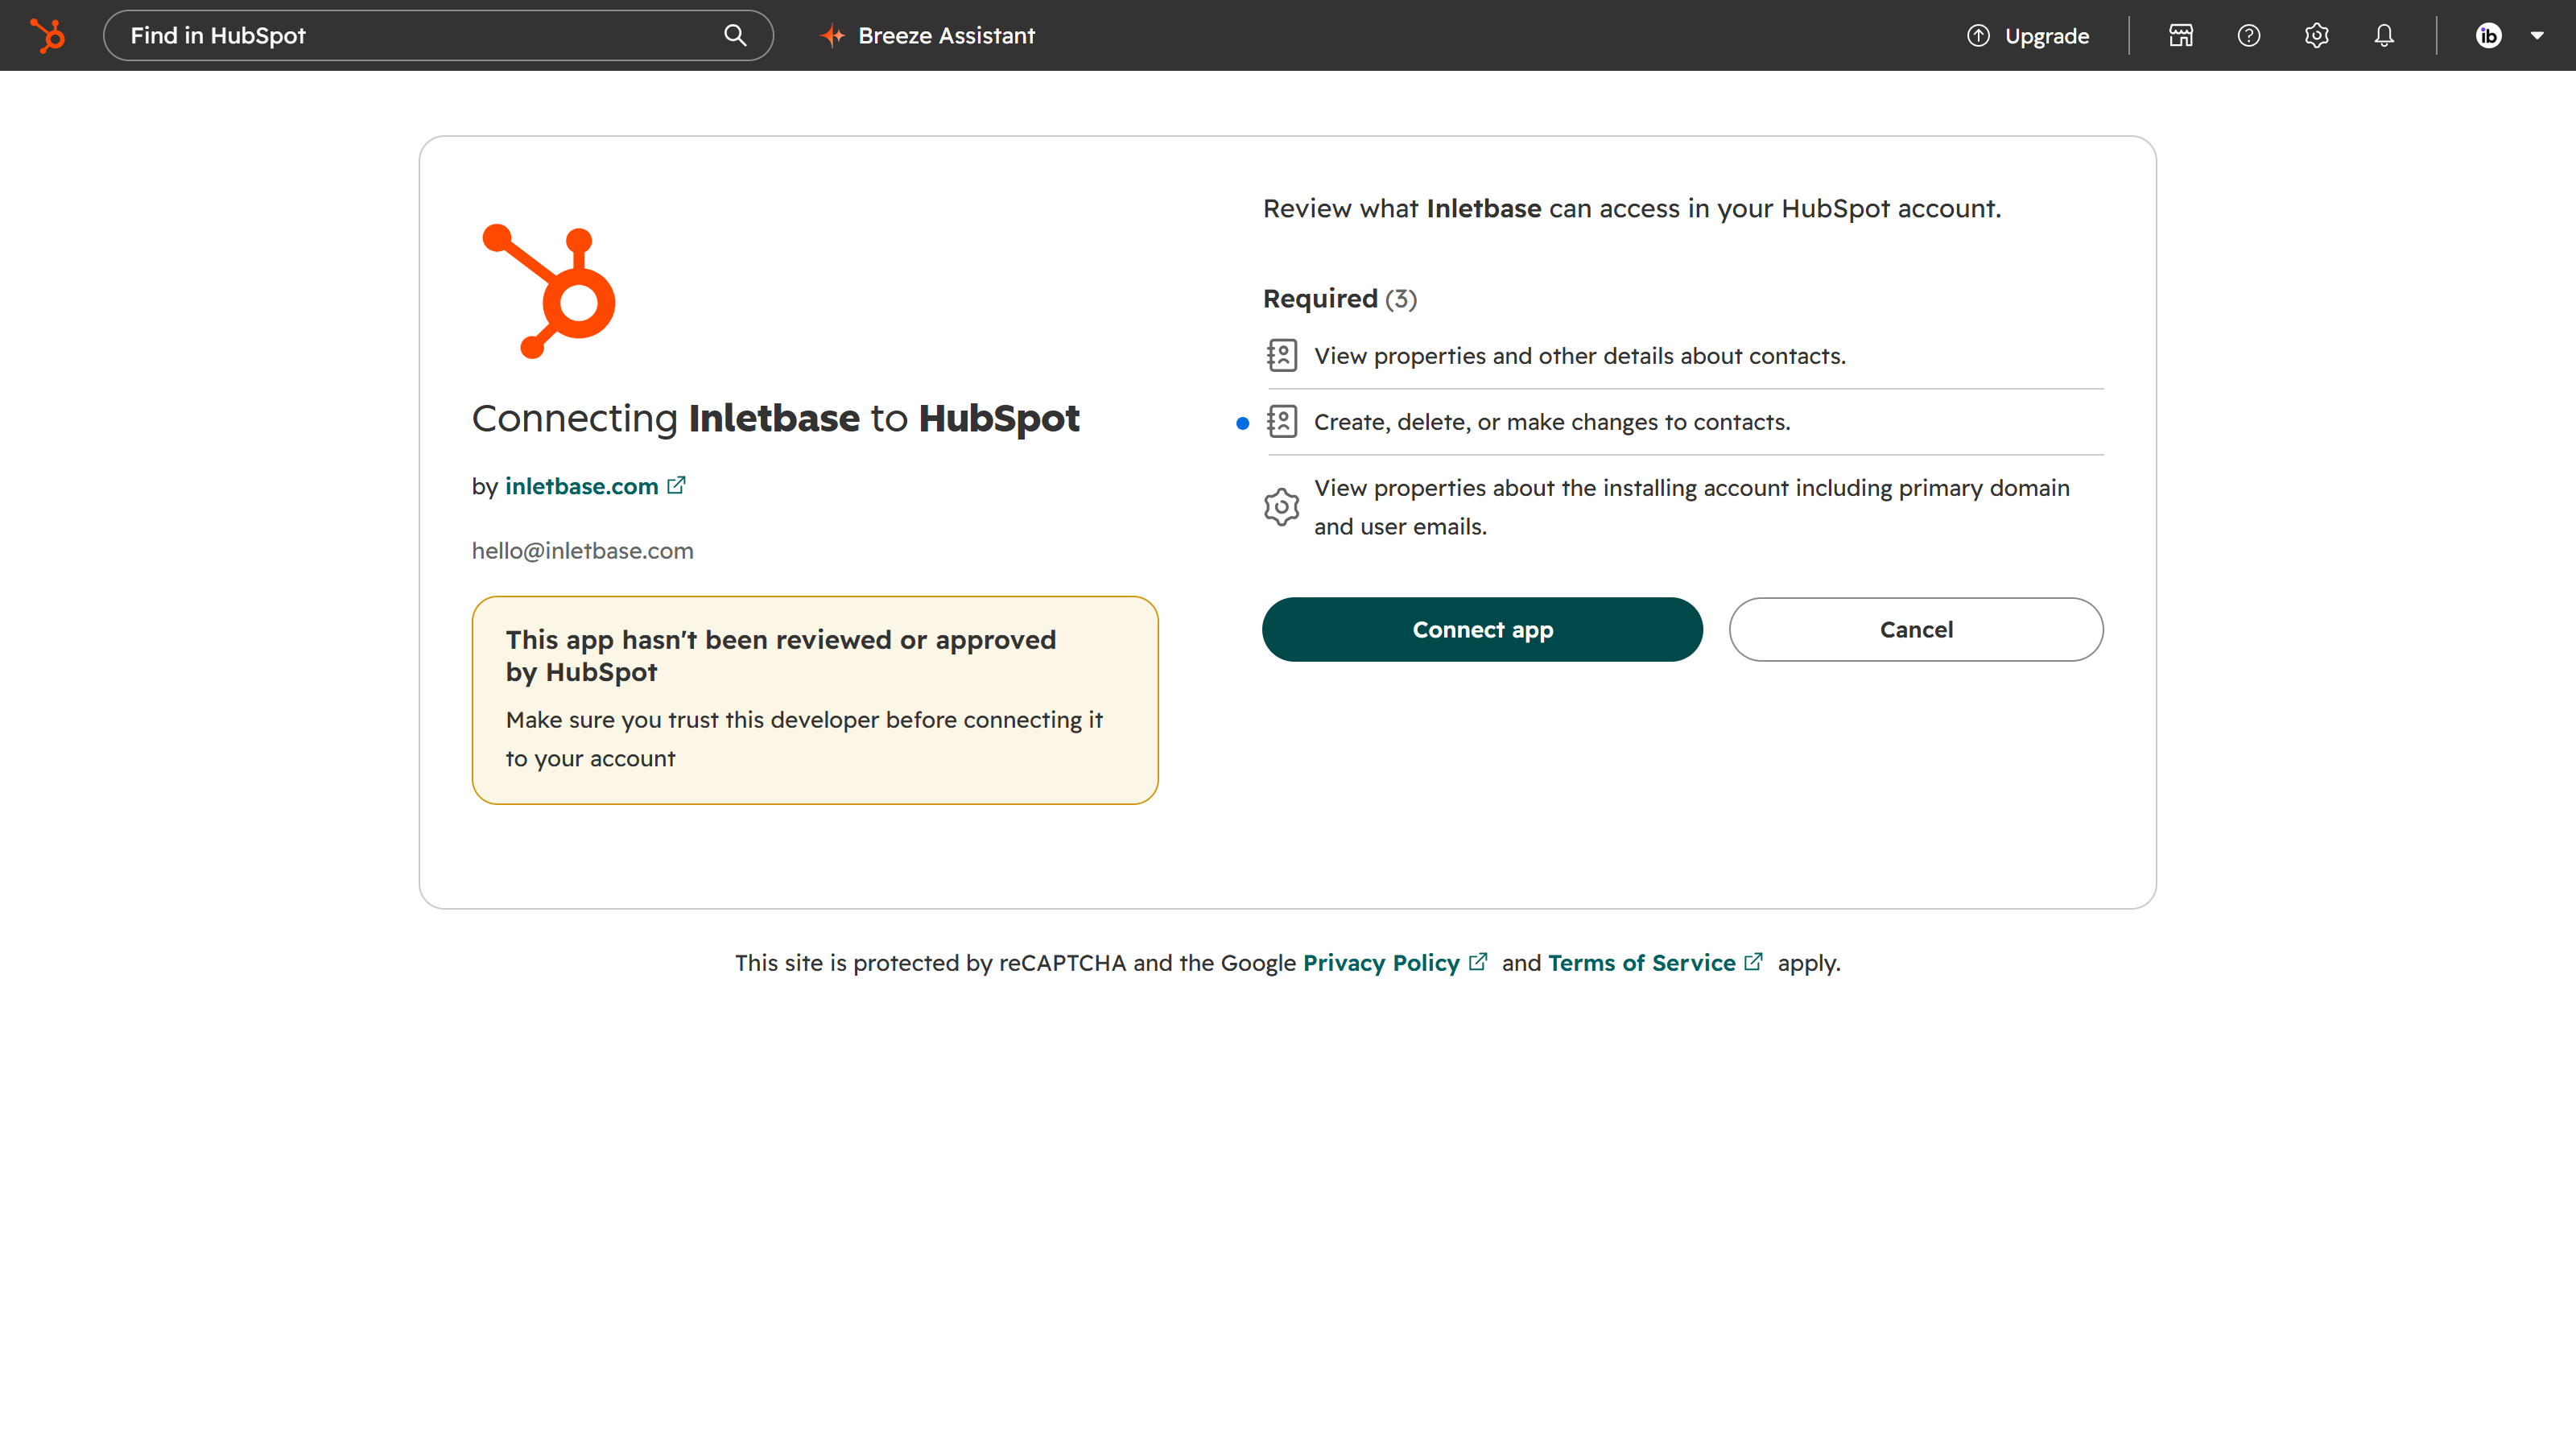
Inletbase requests three permissions and uses all of them:
- Write contacts — to create or update the contact for a submission, and to attach the submission note to it.
- Read contacts — to look up a single email address before writing, so a repeat submission updates the existing contact instead of creating a duplicate, and to read your contact property names so you can choose where each field lands.
- OAuth — the standard permission every HubSpot app needs to maintain its connection.
Inletbase does not request access to deals, companies, tickets, marketing email, or your HubSpot files. Contact lookups are one email address at a time, for the submission being processed; Inletbase never exports or browses your contact database.
Your HubSpot credentials are encrypted before they are stored and are only decrypted in memory at the moment a submission is sent. Read more on the security page.
Step 3: Map your fields
Once connected you will see Workspace connected along with the HubSpot account domain. Nothing is sent to HubSpot yet — you decide which form field fills which HubSpot contact property.
- Under Create Contact, pick a HubSpot property on the left and the form field that should fill it on the right.
- Email is required. HubSpot identifies contacts by email address, so the mapping cannot be saved without it. Inletbase pre-selects your form's email field where it can.
- Add a row for every other property you want filled, such as first name, phone or company.
- Click Save.
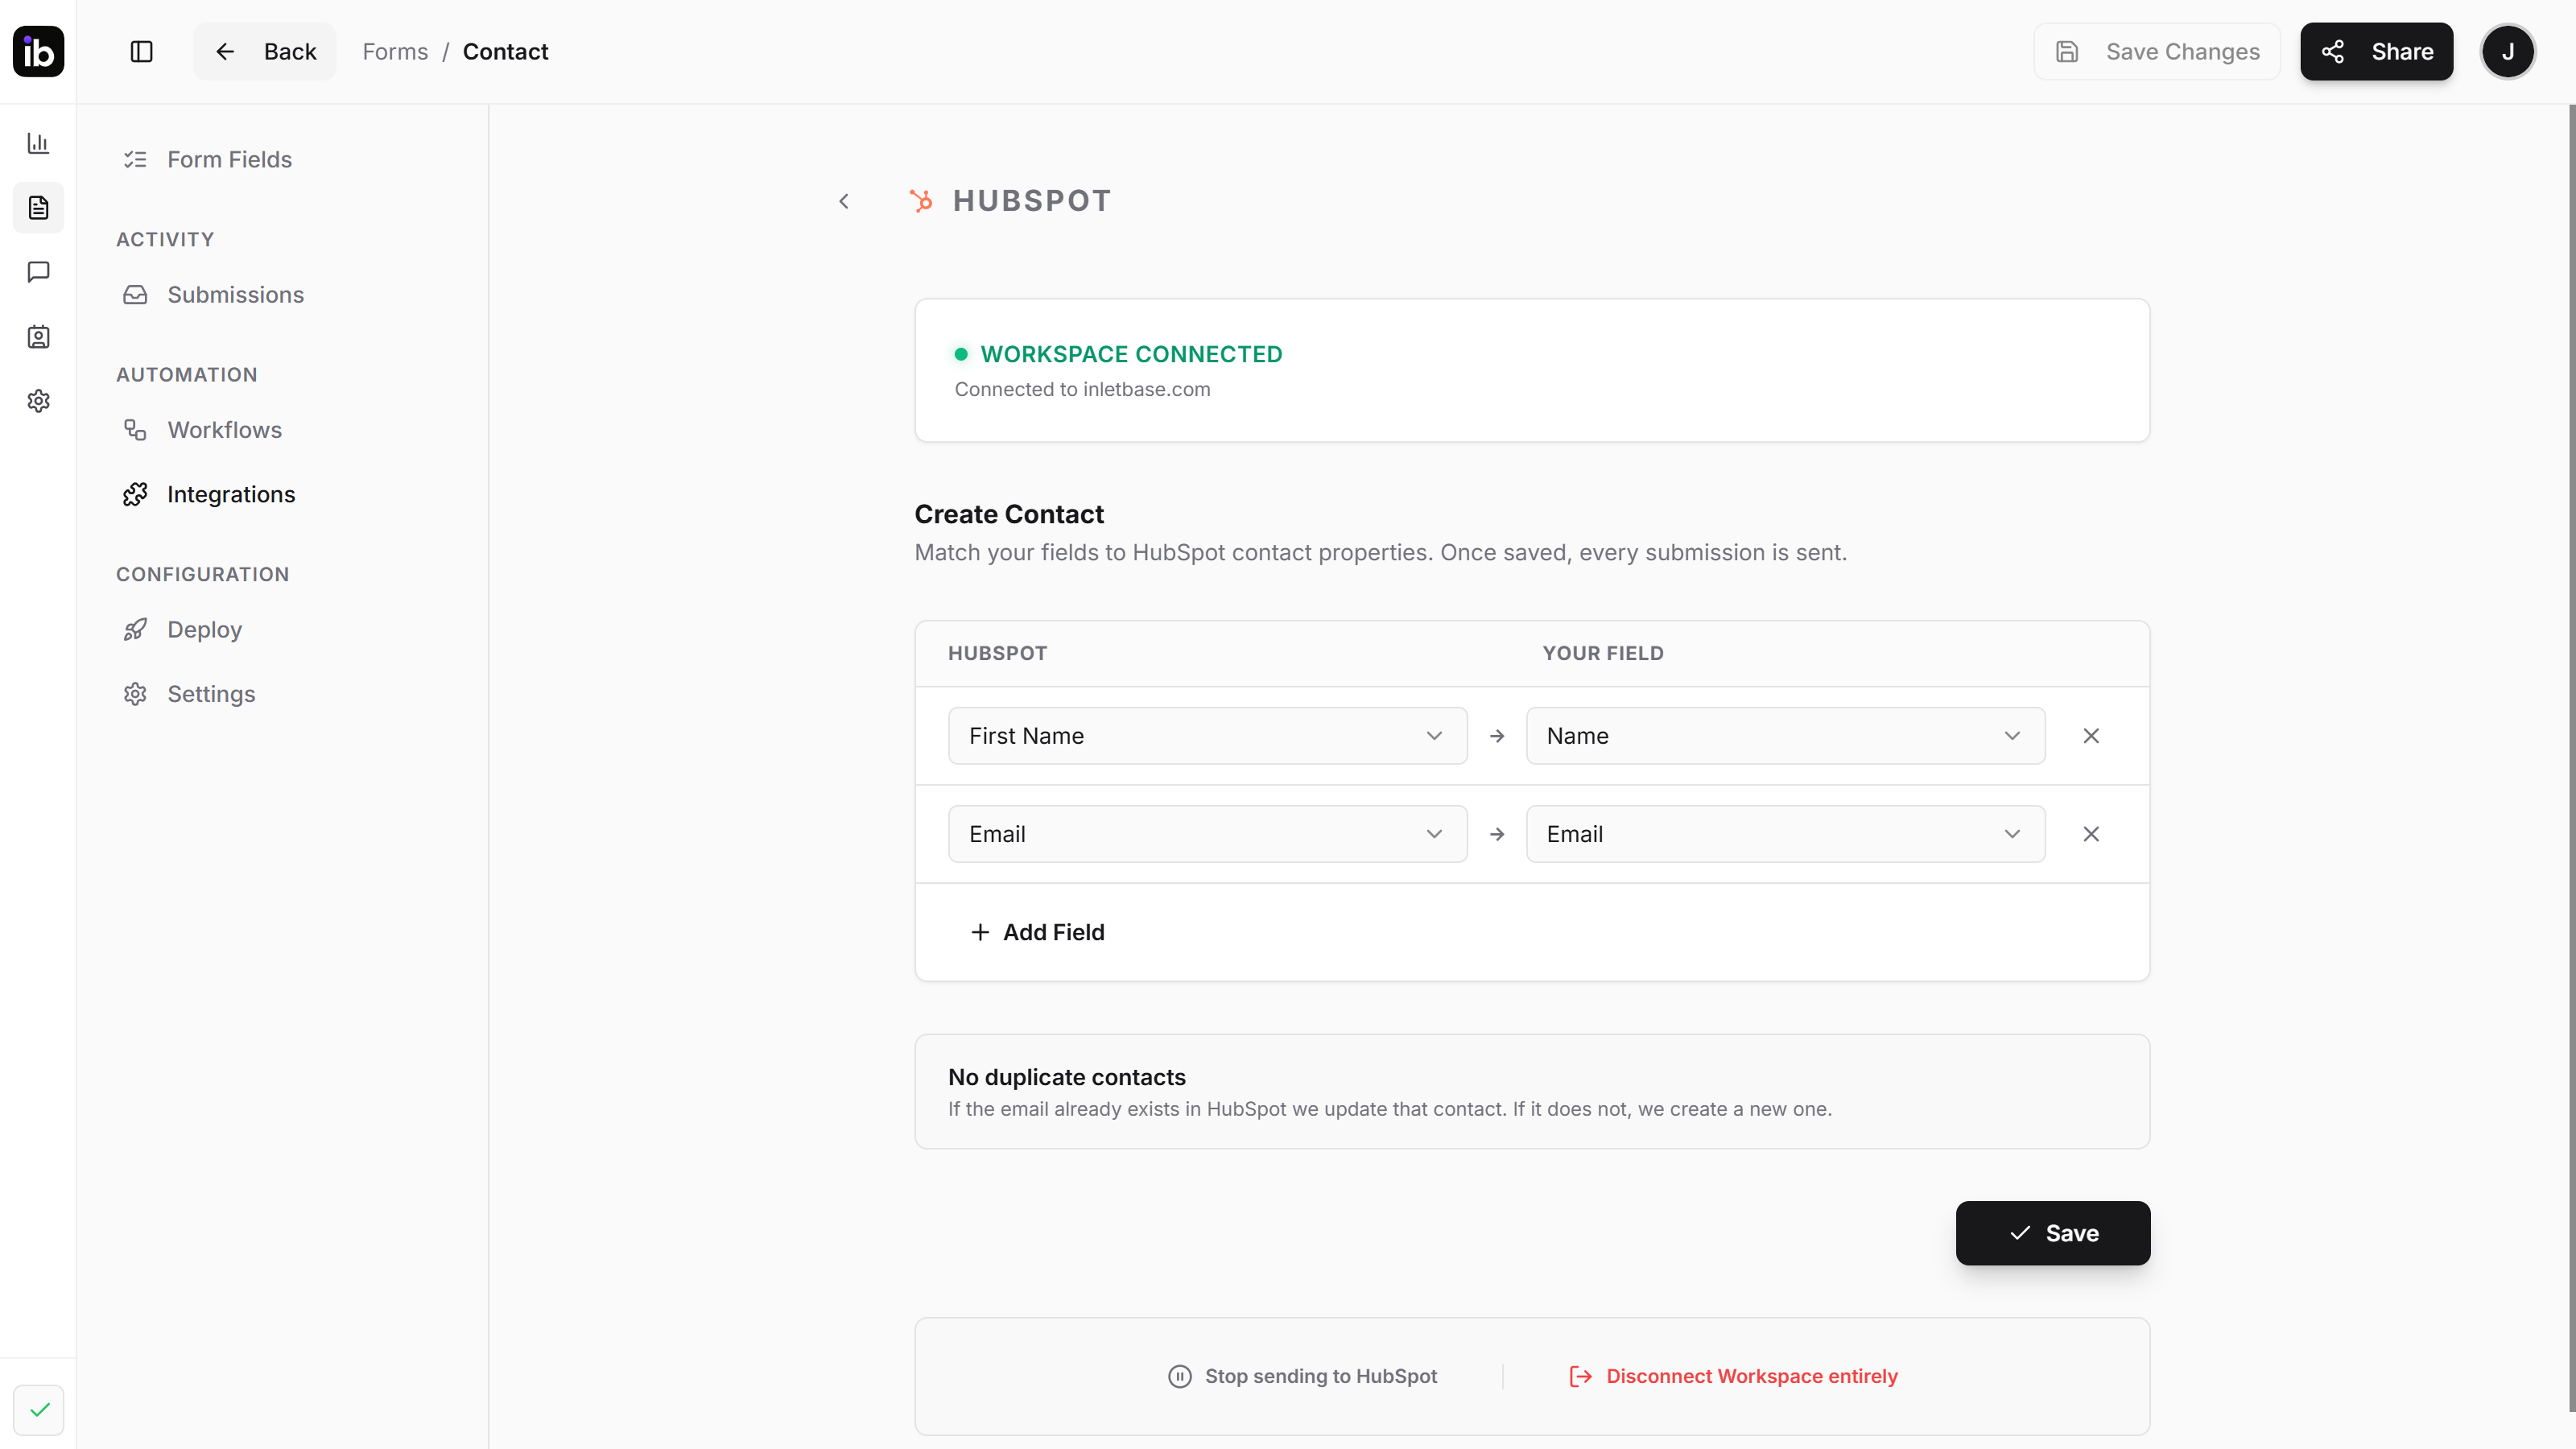
The property list comes from your own HubSpot account, so your custom contact properties appear alongside the standard ones. Only writable properties are offered — HubSpot calculates read-only ones itself.
Step 4: Confirm it works
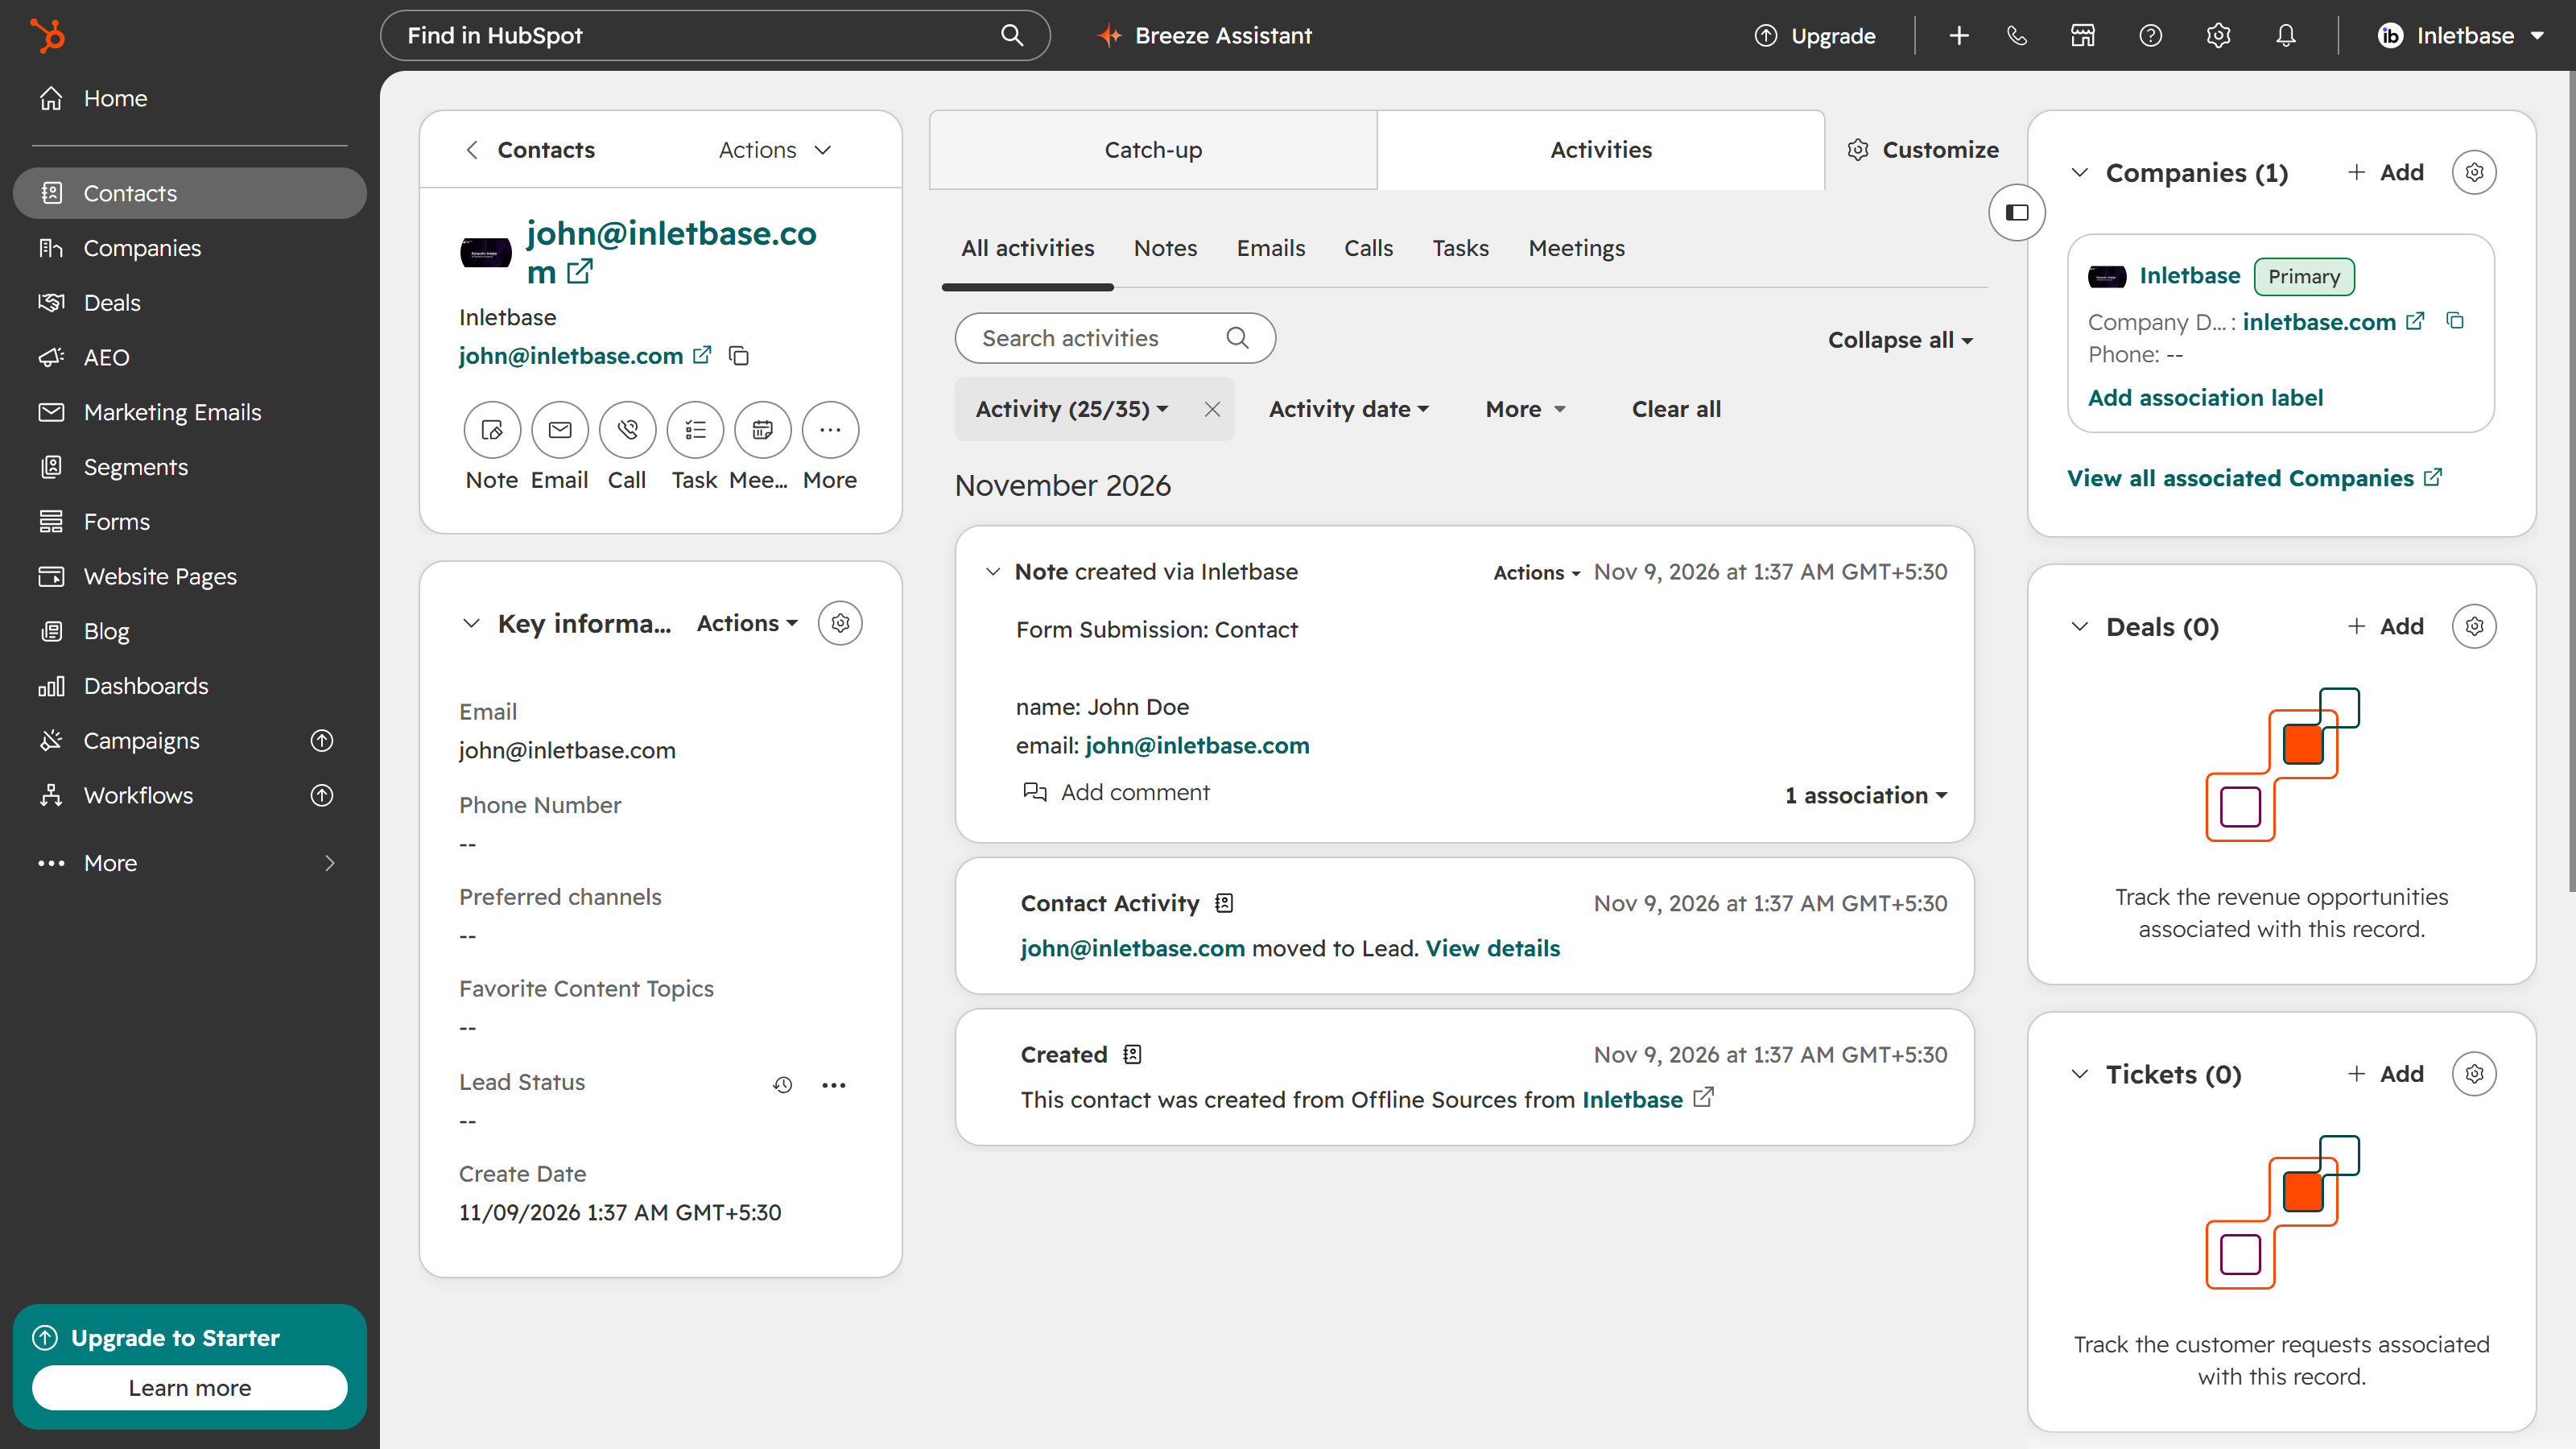
Submit the form once with a real email address, then open Contacts in HubSpot. You should see:
- A contact with the mapped values filled in.
- A note on that contact's activity timeline, titled with your form name and listing every submitted field.
What happens on every submission after that
The sync is automatic and needs no further action. For each submission Inletbase looks up the email address in HubSpot, updates that contact if it exists or creates one if it does not, then attaches a note containing the full submission. File upload fields are included in the note as links.
The contact and the note are sent as two separate operations on purpose. If the note cannot be attached, the contact is still synced and the submission record in Inletbase shows the HubSpot contact ID alongside a note error, rather than reporting the whole sync as failed.
You can check the result of any individual submission by opening it in your form's submissions.
Using HubSpot inside a workflow
The connection is shared across your whole workspace, so the same HubSpot account is also available as a step in Workflows. Use a workflow instead of the Integrations tab when you want the sync to happen only under certain conditions — for example only when a budget field is above a threshold. You do not need to connect the account a second time.
Pausing the sync without disconnecting
To stop one form sending to HubSpot while keeping the account connected, open that form's Integrations tab, choose HubSpot, and click Stop sending to HubSpot. This clears that form's field mapping only. Your other forms, chatbots and workflows carry on, and you can map the form again at any time.
Disconnecting and uninstalling
In Inletbase, open any form's Integrations tab, choose HubSpot, and click Disconnect Workspace entirely. You will be asked to confirm, because this is a single action that both disconnects and uninstalls. It requires workspace admin access.
Confirming does all of the following:
- Uninstalls Inletbase from your HubSpot account. The app is removed from HubSpot's Connected Apps page, and HubSpot emails your super admins a link to reinstall it if that was a mistake.
- Revokes Inletbase's access to your HubSpot account.
- Deletes the stored credentials from Inletbase.
- Stops the sync everywhere at once — every form, chatbot and workflow in the workspace that used this connection.
What this does to your data
Nothing in HubSpot is deleted or modified. Every contact Inletbase created or updated, and every note it attached, stays exactly as it is and remains yours. Uninstalling only removes Inletbase's ability to write new data.
Nothing in Inletbase is deleted either. Your forms and submissions are untouched, and submissions keep arriving as normal — they simply stop being forwarded to HubSpot. The field mappings are cleared, so if you reconnect later you will map your fields again.
You can also remove the app from the HubSpot side, under Settings → Integrations → Connected Apps. If you do that, Inletbase's access stops immediately and syncs begin failing; disconnecting from inside Inletbase as well clears the leftover connection record.
Troubleshooting
"Only workspace admins can connect a CRM"
You are signed in as a member rather than an admin. Ask a workspace admin to connect HubSpot; afterwards you can map fields yourself.
The Save button will not accept my mapping
The Email property is not mapped. HubSpot cannot identify a contact without an email address, so it is required.
Submissions are arriving in Inletbase but not in HubSpot
- Check that the form's mapping was saved, not just edited.
- Confirm the submission actually contained an email address. A submission with an empty email field cannot be synced.
- Open the submission in Inletbase and look at its HubSpot result for the specific error.
- Check your plan is still Pro or Business. If a subscription lapses, integrations are suspended along with the rest of the paid features.
The connection says it expired
Inletbase refreshes its HubSpot access automatically, so this normally means access was revoked on the HubSpot side — often because the app was removed from Connected Apps. Disconnect in Inletbase, then connect again.
A contact synced but has no note
The note is attached separately from the contact, so a note failure never costs you the lead. Open the submission in Inletbase to see the note error. The contact itself is already correct.
Frequently asked questions
- Does connecting HubSpot send my existing submissions?
- No. Only submissions received after you save a field mapping are sent. Connecting your account on its own sends nothing.
- Will I get duplicate contacts in HubSpot?
- No. Inletbase looks up the email address first. If a contact with that email already exists it is updated, and if it does not, a new one is created. This is always on and cannot be switched off.
- Which HubSpot permissions does Inletbase request?
- Three. Reading contacts, so it can look up an email to avoid duplicates and read your contact property names for the field mapping. Writing contacts, so it can create or update them and attach the submission note. And the standard OAuth permission every HubSpot app requires.
- Can Inletbase read my existing HubSpot contact list?
- Inletbase looks up one contact at a time, by the exact email address in a submission, and only to decide whether to create or update. It does not export, browse, or copy your contact database.
- Which Inletbase plan do I need?
- CRM integrations are available on the Pro and Business plans. The free Starter plan cannot use them.
- Who in my workspace can connect HubSpot?
- Only a workspace admin, because a CRM connection applies to the whole workspace. Once an admin has connected it, any member can map form fields to HubSpot properties.
- What happens to my HubSpot data if I disconnect?
- Nothing is deleted or changed in HubSpot. Contacts and notes Inletbase created stay exactly where they are. Disconnecting only stops future submissions from being sent.
- Why is my contact synced but the note missing?
- The contact and the note are sent separately so a note problem never costs you the lead. If a note cannot be attached, the submission record shows the contact ID along with a note error, and the contact itself is unaffected.
Need help?
Email hello@inletbase.com and include your form name and the approximate time of a submission that did not sync — that is usually enough to find the cause straight away.
See also: all integrations, workflows, and general troubleshooting.